What Is The Name Of This Note (Pointing To Middle C, G, or D)?

If you are staring at a piece of sheet music and asking yourself, “what is the name of this note?“, you are not alone. Learning to quickly identify musical pitches on the staff can feel overwhelming at first, but with a few simple landmark guidelines, you can identify notes like Middle C, G, and D instantly.

Whether you are learning piano, singing, or playing a stringed instrument, mastering note identification is the cornerstone of reading music. In this guide, we will break down how to read sheet music notes on both the Treble and Bass clefs with practical examples.

Understanding the Musical Staff and Clefs

Before determining what is the name of this note, you need to check which clef is placed at the beginning of the staff.

  1. Treble Clef (G-Clef): Used for higher-pitched instruments and voices (like the flute, violin, or right hand on the piano). The inner loop of the symbol curls directly around the line for the note G4.

  2. Bass Clef (F-Clef): Used for lower-pitched instruments (like the cello, bass guitar, or left hand on the piano). The two dots frame the line corresponding to F3.

To dive deeper into formal pitch names and scientific pitch notation, explore the comprehensive guide on Music Theory on Wikipedia.

What Is the Name of This Note? Identifying Middle C, G, and D

Let’s look at three essential musical notes that every beginner should know.

1. Identifying Middle C (C4)

Middle C is often the very first note music students learn because it serves as the home base between the Treble and Bass staves.

  • On the Treble Clef: Middle C sits below the main five lines on a short horizontal line called a ledger line.

  • On the Bass Clef: Middle C sits above the main five lines on its own ledger line.

  • Example: If you see a note head floating just beneath the bottom line of the Treble staff with a line drawn straight through its center, the answer to what is the name of this note is Middle C.

2. Identifying the Note G

  • On the Treble Clef (G4): Look at the second line from the bottom. Because the Treble clef is also known as the G-clef, any note placed directly on this second line is G.

  • On the Bass Clef (G2 or G3): The note G3 sits in the top space of the Bass staff, while G2 sits on the bottom line.

3. Identifying the Note D

  • On the Treble Clef (D4): The note D sits in the space directly underneath the bottom line of the staff (hanging just below line 1, right above Middle C).

  • On the Bass Clef (D3): D sits on the middle line (line 3) of the Bass clef.

To practice interactive note recognition drills online, try the free exercises at MusicTheory.net.

Memory Mnemonics for Faster Reading

To answer what is the name of this note without counting up line by line, professional musicians use standard memory tricks:

Treble Clef Lines & Spaces

  • Lines (Bottom to Top – E, G, B, D, F): “Every Good Boy Does Fine”

  • Spaces (Bottom to Top – F, A, C, E): Spells the word “FACE”

Bass Clef Lines & Spaces

  • Lines (Bottom to Top – G, B, D, F, A): “Good Boys Do Fine Always”

  • Spaces (Bottom to Top – A, C, E, G): “All Cows Eat Grass”

Treble Clef Trinity College London Exam Guide: Pass Your Test with Ease

Practical Examples: Quiz Yourself

Look at these quick practice scenarios to test your recognition speed:

Visual Location on Treble Clef Note Name Pitch Level
First ledger line below the staff Middle C (C4) Central Benchmark Pitch
Space tucked directly beneath line 1 D (D4) Just above Middle C
Directly on the second line from the bottom G (G4) Anchored by Treble Clef Loop
Space 3 (from bottom to top) C (C5) One octave above Middle C

Summary

The next time you point to a symbol on a music sheet and ask what is the name of this note, remember these three simple steps: check the clef symbol, locate key landmarks like Middle C or Treble G, and use line/space mnemonics to verify your answer. With practice, identifying Middle C, G, and D will become second nature!


Treble Clef Trinity College London Exam Guide: Pass Your Test with Ease

Preparing for your Treble Clef Trinity College London music exam requires a clear understanding of what examiners look for during both written theory papers and practical performance tests. Whether you are identifying symbols on a score or drawing clefs on a stave, mastering the Treble Clef Trinity College London requirements is essential for securing full marks.

This comprehensive guide covers everything you need to know about the treble clef for Trinity exams, complete with exam-style questions, target keywords, layout tips, and practical score-reading strategies.

The treble clef on a musical staff.
The treble clef on a musical staff. Source: Timacoch / Getty Images

What Is the Treble Clef in Trinity College London Exams?

In Trinity College London syllabuses—from Initial Grade through Grade 1 and beyond—the treble clef is one of the very first musical symbols tested. Also known as the G-clef, it designates the pitch of notes written on the upper stave.

Specifically, the stylized spiral of the clef wraps around the second line from the bottom, establishing that line as G4 (the G above middle C).

Understanding how Trinity evaluates this knowledge helps candidates avoid losing easy marks on exam day.

How Treble Clef Trinity College London Questions Appear in Exams

Trinity College London structures its assessment differently depending on whether you are sitting a practical exam or a written theory paper.

1. Practical Exams (Musical Knowledge Component)

During a face-to-face practical performance exam, the examiner tests your score-reading ability using your own sheet music.

  • Examiner prompt: “Point to a treble clef on your score and tell me what it does.”

  • Ideal candidate response: You physically point to the symbol at the far left of the upper stave and answer concisely: “It is a treble clef, and it marks the line for the note G.”

2. Written Theory Papers (Grade 1 Score Analysis)

Written papers focus on identification, accurate manuscript drawing, and brief terminology questions.

Question Format Typical Exam Instruction Model Answer
Symbol Naming “Name the symbol shown at the start of bar 1.” Treble clef (or G clef)
Score Annotation “Draw a box ($\square$) around the treble clef.” Place a neat box around the symbol on the stave
Pitch Fixation “Which note line does this clef fix on the stave?” G (or G above middle C)

Essential Keywords to Use for Full Marks

To earn full points on Trinity exam papers, candidates must use exact, standardized musical terminology. Using vague phrasing can lead to deducted marks.

When responding to questions about the Treble Clef Trinity College London syllabus, incorporate these essential keywords:

  • Treble clef / G-clef

  • Stave (or staff)

  • Second line from the bottom

  • G4 (or G above middle C)

  • System / Bar 1

Refer to the official Trinity College London Music Theory Syllabus to review all required terminology for your specific grade level.

Most Important Guitar Chords Chart: Free Essential Guide

How to Draw a Treble Clef for Trinity Manuscript Questions

Trinity College London theory papers frequently ask candidates to draw a clef from scratch. Examiners check for precise placement rather than artistic perfection.

Follow these four steps to draw a compliant treble clef:

  1. Vertical Stem: Draw a straight line starting slightly above the top line of the stave down through the bottom line, ending with a small leftward curl.

  2. Top Loop: From the top of the stem, loop rightward and cross back over the stem near the fourth line.

  3. Outer Curve: Sweep down toward the bottom line to form the main outer body of the symbol.

  4. The G Spiral: Finish by looping back up and around the second line, ensuring the inner curve clearly centers around line 2.

Practice this drawing technique on blank manuscript paper prior to your examination date to ensure clean execution.

Key Takeaways for Exam Day

Mastering the Treble Clef Trinity College London requirements is straightforward when you know what to expect.

  • Keep spoken answers under 10 words during practical exams.

  • Ensure your drawn clefs clearly wrap around the second stave line.

  • Use exact technical terms like “G-clef” and “second line” on written papers.

For additional video guidance on Trinity exam preparation, explore educational walkthroughs on the Trinity College London YouTube Channel.


Most Important Guitar Chords Chart: Free Essential Guide

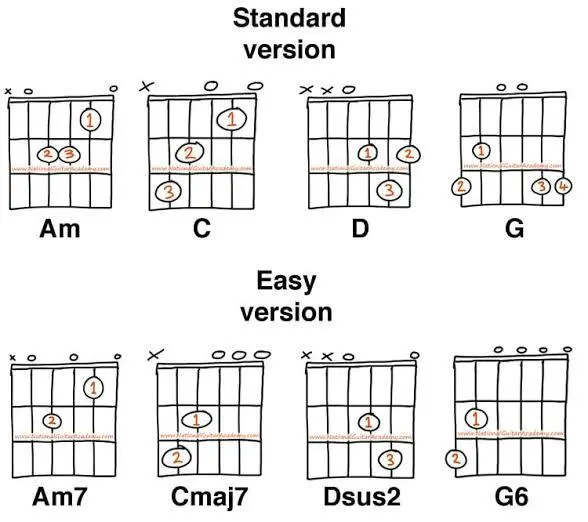
Most Important Guitar Chords Chart access is the single fastest shortcut for any beginner guitarist looking to play hundreds of popular songs without getting bogged down in complex music theory. Learning to play the guitar can feel overwhelming when facing hundreds of fretboard combinations, but the truth is that a small handful of open chords forms the foundation of modern music.

most important guitar chords
Most Important Guitar Chords (Source: National Guitar Academy

Why You Need the Most Important Guitar Chords Chart

When you start learning guitar, memorizing every single chord standard variation isn’t necessary. Instead, focusing on a curated most important guitar chords chart lets you build finger strength, muscle memory, and smooth rhythm transitions early on.

By mastering just 8 fundamental open chords—often called the “essential cowboy chords”—you gain the ability to play over 80% of pop, rock, folk, and country songs. These core shapes include:

  • Major Chords: C Major, A Major, G Major, E Major, and D Major (often remembered by the acronym CAGED).

  • Minor Chords: A Minor (Am), E Minor (Em), and D Minor (Dm).

Having a visual reference sheet pinned to your wall or saved on your tablet drastically speeds up your practice sessions by eliminating constant online searches while tuning up.

Essential Chords Included in the Most Important Guitar Chords Chart

1. The Essential Minor Shapes (Em, Am, Dm)

E Minor and A Minor are usually the easiest shapes for complete beginners because they require only two or three fingers. They offer a deep, rich sound and serve as the backbone for countless acoustic ballads.

2. The Core Major Shapes (C, G, D, A, E)

Major chords produce a bright, happy tone. The transition between G Major, C Major, and D Major is arguably the most famous chord progression in modern music history. Mastering these three shapes alone opens up hundreds of playable song charts.

3. Dominant 7th Shapes (E7, A7, D7, C7)

Once you feel comfortable with open major and minor shapes, blues and funk rhythms require seventh chords. Dominant 7th shapes add tension and color, making your strumming sound vastly more dynamic.

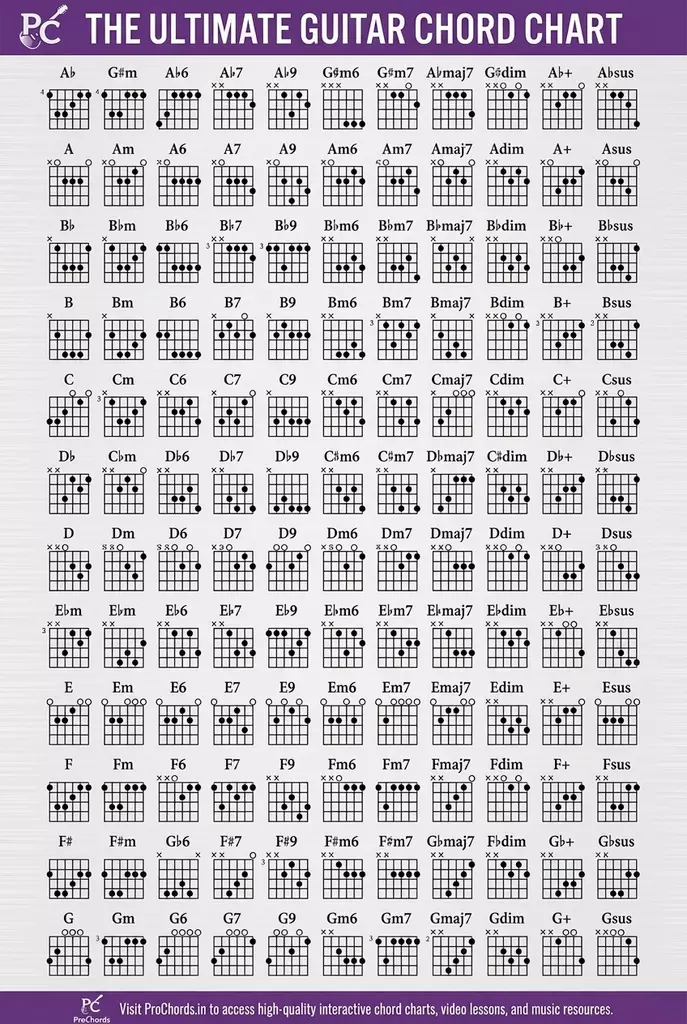
Most Important Guitar Chords Chart Download Free PDF

Most Important Guitar Chords Chart Download
Most Important Guitar Chords Chart Download (Image: Prochords)

Having a portable reference card makes practice seamless wherever you bring your instrument. You can grab a high-resolution printable version of the most important guitar chords chart download free to keep inside your guitar case or desktop folder.

Having a physical copy during daily practice helps eliminate screen distractions like notifications, keeping your focus purely on clean finger placement and clear string ringing.

Easy Guitar Chords For Beginners: 7 Simple Chords to Master Fast

How to Practice Using Your Guitar Chord Reference

To make the most of your visual chord chart, follow this simple daily warm-up sequence:

  1. The Clarity Test: Form a chord shape, then pluck each string individually. If a string sounds muted or buzzes, adjust your fingertip position closer to the fret wire.

  2. Anchor Finger Drills: Identify fingers that remain on the same string when shifting between two chords (for example, the index finger when moving from C Major to A Minor).

  3. 1-Minute Switches: Set a timer for 60 seconds and count how many clean transitions you can make between two shapes (such as G Major to D Major).

For interactive lessons and deeper theory breakdowns on finger positioning, check out free educational resources like JustinGuitar or explore foundational guides on Fender Play.

The Ultimate Guide: Which Guitar Is Best for Beginners?

Start Strumming Today

You don’t need years of formal training to start playing real music on the guitar. By focusing on a clean, accessible most important guitar chords chart, you streamline your learning curve and stay motivated. Print out your reference sheet, grab your guitar, and practice switching between these fundamental shapes every day!


The Ultimate Guitar Chords Chart: Master 10 Easy Shapes Today!

The ultimate guitar chords chart is the fastest shortcut for any beginner looking to pick up a guitar and play real songs without getting bogged down in confusing music theory. Whether you are holding an acoustic guitar for the first time or trying to clean up your strumming on an electric, having a clear visual diagram removes the frustrating guesswork from learning finger placements.

Instead of flipping through heavy instruction books or pausing online video tutorials every five seconds, a clean chord diagram lays out open strings, fretted notes, and muted strings at a single glance.

Why Every Beginner Needs The Ultimate Guitar Chords Chart

Beginner Needs The Ultimate Guitar Chords Chart
Beginner Needs The Ultimate Guitar Chords Chart (Image: Prochords)

Building muscle memory on the fretboard takes time, but trying to memorize chords without a visual reference makes it twice as hard. By keeping the ultimate guitar chords chart on your music stand or phone, you give your brain an instant map for proper hand placement.

Most popular songs in pop, rock, folk, and country rely on the exact same group of fundamental chords. A comprehensive reference sheet highlights these high-yield shapes first, helping you avoid buzzing frets, sore fingertips, and awkward finger stretching.

Key Chord Types Shown on The Ultimate Guitar Chords Chart

A well-structured chord guide breaks down shapes into logical groups so you can build your vocabulary step by step:

1. Essential Open Chords

Open chords use unfretted, vibrating strings to produce a full, resonant sound. They are the easiest shapes to learn first:

  • Major Chords (C, A, G, E, D): Often called the CAGED foundation, these major shapes deliver bright, upbeat tones.

  • Minor Chords (Am, Em, Dm): Essential for adding emotional depth, moodiness, or tension to your rhythm playing.

2. Dominant 7th Shapes

Dominant 7th chords (like A7, D7, and E7) introduce a bluesy edge that resolves naturally back to the root note. They are core elements in blues progressions, funk rhythms, and classic rock hits.

3. Basic Barre Chords

When you are ready to venture past the third fret, barre chords let you move a single hand shape up and down the neck to play in any key. Master the F Major and B Minor shapes first. If you need step-by-step video instructions on hand positioning for these harder shapes, check out the free beginner modules on JustinGuitar.

How to Practice Using The Ultimate Guitar Chords Chart

Having a reference chart nearby is helpful, but practicing with a plan turns awkward hand shapes into muscle memory fast:

  1. Pick Two Chords: Find two contrasting shapes on the ultimate guitar chords chart (like G Major and C Major).

  2. Check Note Clarity: Press down on the frets and pluck each string one by one. Adjust your fingertips if any string sounds muffled or buzzy.

  3. Run 60-Second Transitions: Set a timer for one minute and switch back and forth between the two shapes as many times as you cleanly can.

  4. Play Along with Real Songs: Apply your new shapes to actual chord sheets and lead sheets. You can find thousands of verified user tabs and song arrangements directly on ProChords.

With ten minutes of daily targeted practice alongside a reliable visual reference, shifting between chords will feel like second nature in a matter of weeks.


Acoustic vs Electric Guitar for Beginners: The Ultimate Shocking Truth to Pick Your Best Match

If you are ready to unleash your inner musician, deciding between an acoustic vs electric guitar for beginners is the single most important decision you will make. Both instruments are fantastic starting points, but they offer completely different playing experiences, maintenance needs, and sonic personalities.

Choosing the wrong instrument can lead to unnecessary finger pain, high setup costs, or an expensive piece of wood gathering dust in the corner of your bedroom. This complete, straightforward guide breaks down everything you need to know so you can make the right choice with absolute confidence.

30-Second Decision Matrix: Which One Are You?

Short on time? Here is the fast answer based on your personal goals:

Buy an Acoustic Guitar If: Buy an Electric Guitar If:
• You want grab-and-go simplicity • You want thinner, easier strings
• You love singer-songwriter styles • You need dead-silent practice
• You hate dealing with cables and extra amplifiers • You want to play rock, metal, blues, or use cool effects

What Is the Core Difference Between Acoustic and Electric Guitars?

At its most fundamental level, the debate of acoustic vs electric guitar for beginners comes down to how the instrument produces sound.

  • Acoustic Guitars: These instruments create sound 100% naturally. When you pluck a string, the vibration transfers through the bridge to the hollow wooden body, which acts as a natural soundboard to amplify the music.

  • Electric Guitars: These instruments feature solid wooden bodies and rely on magnetic pickups to convert string vibrations into electrical signals. Those signals travel through a guitar cable into an amplifier, where the tone can be shaped, boosted, or distorted.

According to beginner advisory guides from leading manufacturers like Fender Guitars and Taylor Guitars, understanding how string tension and body geometry affect your hands is key before making your purchase.

Acoustic vs Electric Guitar for Beginners: Playability & Physical Comfort

Acoustic vs Electric Guitar for Beginners
Acoustic vs Electric Guitar for Beginners (Source: ProChords)

When evaluating an acoustic vs electric guitar for beginners, physical comfort directly dictates how often you will want to pick up and practice.

Feature Acoustic Guitar Electric Guitar
String Gauge

Action (String Height)

Body Geometry

Fingertip Discomfort

Portability

Quiet Practice

Thicker (Higher tension)

Higher off the fretboard

Deep, wide, and hollow

Moderate to high initially

High (100% standalone)

No (Always naturally loud)

Thinner (Lower tension)

Lower to the fretboard

Slim, sleek, and contoured 

Low to moderate initially

Requires amp and cables

Yes (Headphone-compatible)

1. String Tension and Finger Soreness

Electric guitars use lighter gauge steel/nickel strings set lower to the neck (known as low “action”). This means pressing down on frets requires significantly less hand strength.

Acoustics use heavier steel or bronze strings under greater tension, which builds calluses faster but causes noticeably more finger soreness during your first month of playing.

2. Body Size and Ergonomics

Acoustic body styles (like Dreadnoughts or Junction shapes) are wide and deep. For younger players, smaller individuals, or anyone practicing seated on a sofa, the bulky body can make wrapping your strumming arm around the guitar feel awkward. Electric guitars are flat, slim, and feature belly contours that rest comfortably against your body.

Noise Levels & Practice Convenience

Where and when do you plan on playing? Your living situation plays a massive role in choosing an acoustic vs electric guitar for beginners.

  • The Electric Advantage (Silent Practice): Unplugged, an electric guitar is barely louder than an unamplified whisper. Modern beginner amplifiers feature 3.5mm headphone jacks, letting you practice late at night or in thin-walled apartments without disturbing family members or neighbors.

  • The Acoustic Advantage (Grab-and-Go Freedom): An acoustic requires zero power outlets, zero cables, and zero extra hardware. You can grab it off the stand, head out to the backyard, take it to a park, or sing around a campfire without lugging gear around.

Genre Matching & Sound Versatility

The music you love listening to should ultimately dictate the guitar you buy.

Best Genres for Acoustic Guitar:

  • Folk & Singer-Songwriter: Unrivaled for open-chord strumming alongside lead vocals.

  • Bluegrass & Country: Wide string spacing makes intricate fingerpicking effortless.

  • Unplugged Pop Hits: Provides a full, rich rhythm foundation for acoustic renditions.

Best Genres for Electric Guitar:

  • Rock, Hard Rock, & Metal: Essential for crunchy distortion, heavy riffs, and screaming lead solos.

  • Blues & Funk: Ideal for expressive string bends, snappy clean chords, and gritty crunch tones.

  • Ambient & Experimental: Pairs with effects pedals (reverb, delay, chorus) for limitless soundscapes.

True Cost Comparison: What Will You Really Spend?

Don’t evaluate the price tag of the instrument alone—factor in the accessories required to get started:

  1. Acoustic Guitar Budget: You only need the guitar, a clip-on digital tuner, a strap, and guitar picks. A dependable beginner starter kit from brands like Yamaha or Fender costs between $150 and $300.

  2. Electric Guitar Budget: Aside from the instrument, you must purchase a small practice amp (typically 10–15 watts) and a standard quarter-inch instrument cable. Beginner electric guitar starter packages usually run between $200 and $400.

Learn Guitar in a Month? The Shocking Truth And Proven Blueprint

3 Dangerous Myths About Acoustic vs Electric Guitar for Beginners

Myth #1: “You MUST learn on an acoustic guitar before you are allowed to play electric.”

Fact: This is completely false. Music theory, chord fingerings, scales, and rhythm apply identically across both instruments. If you want to play rock music, start on electric on day one!

Myth #2: “Electric guitars are too complicated for non-tech-savvy beginners.”

Fact: You don’t need a degree in sound engineering. Pluggable practice amps feature simple “Volume” and “Gain” knobs that take 30 seconds to learn.

Myth #3: “Acoustic guitars are always cheaper than electrics.”

Fact: While the standalone guitar might be cheaper, high-end solid wood acoustics can cost thousands, whereas affordable beginner electric starter packs level the pricing playing field.

Frequently Asked Questions (FAQ)

Q. Is an acoustic vs electric guitar for beginners better for small hands?

A. Electric guitars are generally easier for small hands because their necks are slimmer and the distance between the strings and the fingerboard is much lower.

Q. Which type of guitar builds finger strength faster?

A. Acoustic guitars build finger strength and calluses noticeably faster due to their thicker steel strings and higher action.

Q. Can I practice an electric guitar without plugging it into an amplifier?

A. Yes! An unplugged electric guitar makes a soft acoustic sound that is perfectly audible to you in a quiet room, making it ideal for late-night practice without bothering anyone.

Final Verdict: Which Should You Buy?

At the end of the day, the battle of acoustic vs electric guitar for beginners comes down to motivation.

The best guitar is not the one a blog tells you to buy—it is the one that excites you so much that you want to pick it up every single day after work or school. If you love the acoustic warmth of indie music, buy the acoustic. If you crave distortion, solos, and silent practice options, buy the electric.


The Ultimate Guide: Which Guitar Is Best for Beginners?

Which guitar is best for beginners? If you are taking your first steps into the world of music, finding the right starter instrument can feel overwhelming. With hundreds of body shapes, string types, and price tags on the market, picking an instrument that balances tone, playability, and affordability is critical. Choosing an easy to play guitar ensures that your early practice sessions remain inspiring rather than painful or frustrating.

Whether you plan to strum campfire classics or master intricate fingerstyle melodies, this comprehensive guide reviews the top beginner guitar recommendations, evaluates budget-friendly acoustic guitar prices, and gives you actionable expert advice.

A standard acoustic guitar suitable for new players.
A standard acoustic guitar suitable for new players. Source Thomann

Which Guitar Is Best for Beginners? Acoustic vs. Electric vs. Classical

Before diving into specific models, it is essential to understand the three primary types of entry-level guitars:

  1. Acoustic Guitars (Steel-String): These are the most popular choice for new players. They produce a vibrant, crisp, room-filling sound without needing external amplification. While steel strings require a bit of fingertip endurance at first, they are versatile enough for almost any genre, including pop, rock, country, and folk.

  2. Classical Guitars (Nylon-String): Classical guitars feature soft nylon strings that are much gentler on novice fingers. They have a warmer, mellower sound and wider neck profiles. They are ideal for classical, flamenco, and fingerstyle folk playing.

  3. Electric Guitars: Electric instruments have thin necks and light strings, making them physically easier to press down. However, they require an amplifier and cable, which adds cost and complexity for absolute novices.

For most new players seeking versatility, self-containment, and rich projection, a steel-string dreadnought or auditorium acoustic is the gold standard.

Which Guitar Is Best for Beginners to Learn On?

best acoustic guitar for beginners
Best Acoustic Guitar For Beginners

When determining which guitar is best for beginners, pay attention to three crucial factors:

  • Top Wood Construction (Solid vs. Laminate): Guitars with a solid spruce top resonate significantly better and sound richer over time compared to all-laminate construction.

  • Action & Neck Profile: “Action” refers to the distance between the strings and the fretboard. Lower action means you do not have to press down forcefully, making it an essential characteristic of easy to play guitars.

  • Body Size: Dreadnoughts offer maximum bass and projection, but smaller auditorium or parlor shapes provide superior ergonomic comfort for younger players or adults with smaller frames.

Top Acoustic Recommendations With Price

To simplify your buying decision, here are five top-rated best acoustic guitar for beginners models currently available on the market, detailed with features and competitive acoustic guitar prices:

Model Body Type Key Highlights Price Range (USD / INR)
Fender CD-60S Dreadnought Solid Spruce top, rolled fingerboard edges for ultimate fretting comfort ~$230 USD / ₹17,900 INR
Yamaha FG800 Traditional Western / Dreadnought Solid Sitka Spruce top, warm tone, exceptional Japanese build consistency ~$220 USD / ₹19,800 INR
Gretsch G9500 Jim Dandy Parlor Compact body, short 24″ scale length, perfect for kids and small hands ~$189 USD / ₹15,500 INR
Yamaha F310 Dreadnought Ultra-affordable entry point, dependable tuning stability, classic starter model ~$160 USD / ₹11,300 INR
Epiphone DR-100 Dreadnought Classic square-shoulder design, powerful projection, durable build ~$179 USD / ₹14,500 INR

1. Fender CD-60S — The Best Overall Value

Fender CD-60S

The Fender CD-60S routinely ranks among the top beginner guitar recommendations world-wide. It features a solid spruce top that delivers a punchy, balanced tone alongside mahogany back and sides. Its standout feature is Fender’s “Easy-to-Play” neck profile with rolled fingerboard edges, which drastically reduces palm and finger fatigue for new students.

2. Yamaha FG800 — The Gold Standard for Adults

Yamaha FG800

When experts evaluate which guitar is best for beginners, the Yamaha FG800 is almost always in the top spot for adult players. Equipped with scalloped X-bracing and a solid spruce top, this instrument projects a full, rich resonance typically found in guitars double its price point.

3. Gretsch G9500 Jim Dandy Parlor — Best for Young Players

Gretsch G9500 Jim Dandy Parlor
Gretsch G9500 Jim Dandy Parlor (Source: Johns Music)

If you are looking for a smaller instrument that doesn’t compromise on vintage character, the Gretsch Jim Dandy is an ideal pick. Its parlor-sized frame and reduced scale length make finger stretches easy, making it one of the most accessible easy to play guitars on the market today.

How to Choose Which Guitar Is Best for Beginners

When making your final choice, follow this quick checklist:

  1. Set a Realistic Budget: Aim to spend between $150 and $250 (₹11,000 – ₹20,000 INR). Cheaper “toy” guitars below $80 often fail to hold tuning and have high action that discourages practice.

  2. Factor in Essential Accessories: Budget an extra $30–$50 for a digital clip-on tuner, a padded gig bag, extra strings, and a few plectrums (picks).

  3. Try Before You Buy (or Buy from Reputable Retailers): If possible, visit a local music shop to feel how the body sits in your lap. For in-depth professional gear evaluations and comparisons, read trusted buyer guides on Guitar World.

Finding the right instrument sets the foundation for years of musical enjoyment. By choosing a high-quality starter acoustic like the Yamaha FG800 or Fender CD-60S, you will be well-equipped to master your first chords with confidence.


Learn Guitar in a Month? The Shocking Truth And Proven Blueprint

Is it actually possible to learn guitar in a month, or better yet, in 7 days?

If you browse YouTube or TikTok, you will find hundreds of clickbait videos promising to transform complete beginners into shredding rockstars in less than a week. But when you pick up an acoustic or electric guitar for the first time, your fingers hurt, your chords sound muted, and rhythm feels completely unnatural.

So, what is the honest truth? Can you learn guitar in a month, or are those rapid transformation claims pure myth?

In this comprehensive guide, we unpack what is genuinely achievable in 7 days versus 30 days, break down a realistic 4-week practice schedule, and give you the exact steps to play your first full songs faster than you thought possible.

Practicing open chords on an acoustic guitar. Source JamPlay.com

What Does “Learning Guitar” Actually Mean?

Before answering if you can learn guitar in a month, we need to define success. Learning guitar is not a binary switch—it is a lifelong continuous spectrum.

  • In 7 Days: You can learn 2 or 3 basic open chords (like E minor and A major) and play a slow, single strumming pattern. You will not be playing full songs fluently yet.

  • In 30 Days: You can master 4 to 6 core open chords, transition smoothly between them, lock into a steady rhythm, and play dozens of popular pop, rock, and folk songs from start to finish.

  • In 6 Months to 1 Year: You gain fluency with barre chords, basic solos, dynamic strumming, and fingerpicking patterns.

If your goal is to strum along to popular songs around a campfire or play your favorite acoustic tunes, you can absolutely learn guitar in a month with disciplined, daily practice.

Can You Learn Guitar in 7 Days? The Realistic Expectations

If you only have 7 days, set realistic expectations to avoid frustration. Building muscle memory and developing fingertips calluses takes time.

Here is what a realistic 7-day milestone looks like:

Day Practice Focus Realistic Goal
Day 1–2 Holding the guitar, tuning, pressing frets Clear single notes without buzzing
Day 3–4 Learning E Minor (Em) and A Major (A) Switching between 2 chords under 5 seconds
Day 5–6 Basic down-strum rhythm (4 beats per bar) Playing in time with a metronome
Day 7 Combining chords + basic strumming Strumming a simple 2-chord loop

While 7 days gives you a solid taste of the instrument, attempting to master full songs in a week usually leads to finger soreness and technique bad habits. Giving yourself a full 30-day window yields far better, long-lasting results.

The 4-Week Blueprint: How to Learn Guitar in a Month

To successfully learn guitar in a month, you do not need 4 hours of daily practice. In fact, 20 to 30 minutes of focused, daily practice is vastly superior to a single 3-hour marathon on Sunday.

How to Learn Guitar in a Month

Follow this structured weekly progression to maximize your progress:

Week 1: Foundation, Mechanics & First Open Chords

  • Focus: Instrument setup, finger placement, and the open chords Em, C, and G.

  • Key Technique: Keep your fingers arched and press right behind the fretwire to avoid string buzz.

  • Pro Tip: Use an online tuner like Fender Tune before every single practice session to train your ear.

Week 2: Smooth Chord Transitions & The Magic 4-Chord Combo

  • Focus: Add the D Major chord to your toolkit.

  • Key Technique: Practice the “1-Minute Chord Changes” drill. Pick two chords (e.g., G to D) and count how many times you can switch smoothly in 60 seconds.

  • Goal: Reaching 30 clean transitions per minute unlocks hundreds of songs!

Week 3: Master Rhythm and Strumming Patterns

  • Focus: Transition from simple down-strums to the iconic Island Strum (Down - Down-Up - Up-Down-Up).

  • Key Technique: Keep your strumming wrist loose and relaxed. Maintain continuous hand movement even when you aren’t hitting the strings.

Week 4: Playing Your First Complete Songs

  • Focus: Putting rhythm and chord transitions together into full song structures (Verse, Chorus, Outro).

  • Songs to Try:

    • “Riptide” by Vance Joy (Am, G, C)

    • “Stand By Me” by Ben E. King (G, Em, C, D)

    • “Knockin’ on Heaven’s Door” by Bob Dylan (G, D, Am / G, D, C)

  • Resource: Search chord sheets on Ultimate Guitar to practice along with lyrics.

Guitar Chord Chart for Kids: Super Easy Beginner Chords to Learn Fast

4 Crucial Tips to Learn Guitar Fast Without Quitting

1. Build Finger Calluses Early

During your first two weeks, your fingertips will feel tender. This is completely normal. Practice daily for 20 minutes rather than long sessions to build protective calluses naturally without blistering your skin.

2. Don’t Skip the Metronome

Rhythm is 80% of music. Playing the right chords with bad timing sounds messy, but simple chords played with great rhythm sounds fantastic. Practice with a free metronome app set to 60–70 BPM.

3. Leverage High-Quality Free Lessons

You don’t need expensive private tutors right away. Structured free platforms like JustinGuitar offer world-class beginner courses that guide you step-by-step through your first month.

4. Practice Slow to Play Fast

When learning a new chord progression or song, slow down to a crawl. Precision creates muscle memory; speed comes automatically once your brain maps the movement.

Final Verdict: Is 30 Days Enough?

So, can you learn guitar in a month?

Yes! While you won’t be playing lightning-fast solos or complex classical pieces in 30 days, a dedicated month of practice is more than enough time to master fundamental open chords, strum rhythmically, and confidently play dozens of iconic songs.

Stop waiting for the “perfect time”—grab your guitar, commit to 20 minutes a day, and start your 30-day journey today!


Guitar Chord Chart for Kids: Super Easy Beginner Chords to Learn Fast

Hey there, young rockstars! Are you ready to strum some super fun tunes on your guitar? This is your special guide to Easy Guitar Chord Chart for Kids. We’ll learn beginner guitar chords for children that are simple and exciting. Imagine your guitar as a magic wand that makes music when you press the right spots. Chords are like secret codes that make songs sound awesome. They’re groups of notes played together, and the best part? These fun guitar chords for kids use just 1 or 2 fingers at first, so your little hands can handle them easily.

First, let’s talk about how to read a chord chart. It’s like a map of your guitar’s neck. The thick line at the top is the nut (where the strings start). The vertical lines are the strings – the thickest one on the left is the low E string, and the thinnest on the right is the high E. Horizontal lines are the frets (those metal bars). Numbers or dots show where to put your fingers: 1 for index, 2 for middle, 3 for ring, 4 for pinky. O means play the string open (no finger), and X means don’t play that string. Easy peasy, right? Now, let’s dive into our adventure with five magical chords!

Guitar Chord Chart for Kids

The Easy E Minor Chord (Em) – The Sad Puppy Sound

Em is the easiest chord ever – it’s like giving your guitar a gentle hug! It sounds a bit mysterious, like a puppy whining for a treat. To play it: Put your middle finger (2) on the second fret of the A string, and your ring finger (3) on the second fret of the D string. Strum all six strings. Boom! You’re making music. Practice switching to it slowly, like a turtle racing. This chord is in tons of cool songs, like “Horse with No Name.”

How to Play the E Minor Chord (Positioning, Variations, and Exercises)
How to Play the E Minor Chord (Positioning, Variations, and Exercises) (Source: Gchord)

The Awesome A Minor Chord (Am) – The Adventure Chord

Next up, Am! It’s like Em’s best friend. It sounds adventurous, perfect for storytelling songs. Place your index finger (1) on the first fret of the B string, middle (2) on the second fret of the D string, and ring (3) on the second fret of the G string. Strum from the A string down (skip the low E). Imagine your fingers are explorers climbing a mountain. Fun fact: Am and Em together can play simple versions of “Let It Be” by The Beatles!

Best Eight Guitar Chords for Kids

The Cheerful C Major Chord (C) – The Happy Cloud

C is bright and happy, like a fluffy cloud on a sunny day. For kids, try the easy version: Index (1) on the first fret of the B string, middle (2) on the second fret of the D string, and ring (3) on the third fret of the A string. Strum from the A down. It might feel stretchy at first, but practice makes it fun! This chord is in “Twinkle Twinkle Little Star” – strum it and sing along to feel like a star yourself.

C major guitar chord - GtrLib Chords
C major guitar chord – GtrLib Chords

The Groovy G Major Chord (G) – The Giggle Chord

G is goofy and full of giggles! It uses three fingers: Index (1) on the second fret of the A string, middle (2) on the third fret of the low E, and ring (3) on the third fret of the high E. Strum all strings. Think of it as a funny face your fingers make. For super easy mode, some kids start with a one-finger G – just press the third fret on the high E and strum. G is great for “You Are My Sunshine,” which will make everyone smile.

Best Eight Guitar Chords for Kids

The Daring D Major Chord (D) – The Dinosaur Roar

Last but not least, D! It roars like a friendly dinosaur. Put index (1) on the second fret of the G string, ring (3) on the third fret of the B string, and middle (2) on the second fret of the high E. Strum from the D string down. Your pinky stays free for high-fives! D pairs perfectly with G for songs like “Happy Birthday” – surprise your friends at parties.

D Chord on the Guitar (D Major) - 10 Ways to Play (and Some Tips/Theory)
D Chord on the Guitar (D Major) – 10 Ways to Play (and Some Tips/Theory)

Now that you’ve got these chords, let’s put them to work! Try this simple song pattern: Em – Am – C – G – D. Strum each four times and hum your own tune. Or play “Row Row Row Your Boat” with C and G. Remember, practice a little every day – start slow like a snail, then speed up like a rocket. If your fingers get tired, shake them out and try again. You’re already a guitar hero in training!

Best Eight Guitar Chords for Kids

For more inspiration, check out this colorful chart with animal buddies to make learning even more playful. Keep rocking, kids – your guitar adventures are just beginning! If you master these, you can tackle any song. What’s your favorite chord so far?


How to Play Guitar Barre Chords: Beginner Chart

Guitar barre chords (also called barre chords guitar) are one of the most useful skills any guitarist can learn. They let you play almost any chord anywhere on the neck, opening up tons of songs in different keys. Whether you’re a kid just starting out, a teen jamming with friends, or an adult picking up the guitar later in life, barre chords can feel tricky at first—but they’re totally doable with the right approach.

This guide explains everything about guitar barre chords in a simple, fun way. We’ll cover what they are, why they’re awesome, how to play them, a guitar barre chords chart, common problems like buzzing strings, and answers to the top questions beginners ask. Let’s make this easy and exciting—no matter your age!

What Are Barre Chords?

A regular open chord (like easy C or G) uses open strings and fingers on just a few frets. A barre chord is different: your index finger “bars” (presses down flat) across all six strings at one fret, acting like a movable nut. Then your other fingers make the chord shape behind it.

This movable trick means one shape can become many chords! Slide it up or down the neck to change the key. For example, the same shape at the 1st fret might be F major, but at the 3rd fret it’s G major.

There are two main families:

  • E shape barre chords (based on the open E chord)
  • A shape barre chords (based on the open A chord)

These cover most major, minor, and seventh chords you’ll need.

Why Learn Barre Chords?

Once you get them, you can play thousands of songs without memorizing new shapes for every key. Songs by artists like Ed Sheeran, Taylor Swift, or classic rock bands often use them. They’re the “Swiss Army knife” of guitar—super versatile!

10 Barre Guitar Chords You MUST Know - TrueFire
10 Barre Guitar Chords You MUST Know – TrueFire

Barre Chords - The Swiss Army Knife of Guitar
Here are some popular barre chord charts to visualize the main shapes.

Basic Barre Chord Shapes (with Guitar Barre Chords Chart)

Start with these two root shapes. Practice them higher up the neck (like fret 5 or 7) first—strings are easier to press there!

E Shape (Root on Low E String):

  • Index finger bars all strings.
  • Ring and pinky on strings 5 and 4 (like open E but shifted).
  • Middle finger on string 3 (for major).

For F major (1st fret E shape): It looks tough, but it’s common!

F Chord on the Guitar (F Major) - 10 Ways to Play (and Some Tips/Theory)
F Chord on the Guitar (F Major) – 10 Ways to Play (and Some Tips/Theory)

A Shape (Root on A String):

  • Index bars all strings.
  • Ring, pinky, and middle make an A shape but one string higher.

For B major (2nd fret A shape, but often played at 7th for easier reach).

Guitar Barre Chord Shapes Chart in Illustrator
Guitar Barre Chord Shapes Chart in Illustrator, PDF – Download | Template.net

Print or bookmark a barre chord chart for guitar like the ones above. They show dots for fingers (1=index, 2=middle, etc.) and X for muted strings.

How to Make Barre Chords Sound Clean / Stop Buzzing or Muting Strings?

This is the #1 complaint! Buzzing or dead strings happen when pressure isn’t even or fingers aren’t placed right.

Tips to fix it:

  • Roll your index finger slightly toward the fretboard—use the bonier side (not the soft pad) for better contact. This helps press all strings evenly without gaps.
  • Keep your thumb behind the neck (like pinching), opposite your index finger for leverage. Don’t squeeze too hard with your hand—use your arm to pull the guitar toward your body.
  • Press close to the fret wire (just behind it) so strings don’t buzz.
  • Check your guitar setup: If action (string height) is too high, it’s harder. Lighter strings help too.
  • Start slow: Strum one string at a time to find which one buzzes, then adjust.

With practice, your hand builds strength, and clean sounds come naturally.

How To Play Barre Chords -- Learn The Fret Hand Secret To Playing Barre Chords
How To Play Barre Chords — Learn The Fret Hand Secret To Playing Barre Chords

How To Play Barre Chords -- Learn The Fret Hand Secret To Playing Barre Chords
These photos show good thumb placement and finger rolling for clean barre chords guitar.

Best Tips/Tricks/Secrets to Learning Barre Chords Easier

Don’t jump straight to hard ones like F at the 1st fret. Use these smart shortcuts:

  • Start with partial barres: Barre just 3-4 strings first (like a mini version) to build strength.
  • Practice E and A shapes higher up (frets 5-8)—strings are thinner and closer together, so easier on fingers.
  • Build thumb leverage: Squeeze gently like holding a tennis ball. Relax your wrist—keep it straight.
  • Short daily practice: 5-10 minutes a day beats hours once a week. Your hand gets stronger fast!
  • Use lighter strings or an electric if possible (more on that below).
  • Warm up: Shake hands, stretch fingers before playing.

Kids and beginners: Make it a game—time how long you can hold a clean barre without hurting!

How Long Does It Realistically Take to Get Barre Chords Down?

It varies, but be patient—it’s normal to struggle at first.

  • Many beginners get a clean single barre chord in 2-4 weeks with daily practice.
  • Switching smoothly between them and using in songs? Often 1-3 months.
  • Full comfort (no pain, quick changes)? 3-6 months or up to a year for some.

Factors: Hand size (smaller hands might take longer), guitar setup, and if you played other instruments before. Daily short sessions speed it up a lot. Everyone improves—keep going!

Are Barre Chords Easier on Electric vs Acoustic Guitar?

Yes, usually much easier on electric!

Electric guitars have lighter strings (thinner gauge) and lower action (strings closer to frets), so less pressure needed. Acoustics often have heavier strings and higher action for louder sound, making barres tougher.

Tip: If you’re on acoustic and struggling, try an electric (or lighter strings) to learn the shape first—then go back to acoustic. It’ll feel way easier after!

Should Beginners Learn Barre Chords Right Away, or Wait? When Is the Right Time?

Wait a bit—don’t rush!

Learn easy open chords first (A, D, E, G, C, Am, Em). Get comfy switching them and playing simple songs.

When? After 1-3 months, or when open chords feel easy and your fingers are stronger. Some kids/teens start earlier if motivated; adults might wait longer.

Trying early isn’t bad—it builds strength—but don’t get frustrated. Use power chords (root + fifth, no full barre) as a bridge.

The right time is when you’re excited to try, not forced. Everyone learns at their own pace!

Final Thoughts

Guitar barre chords unlock so much music—keep practicing, stay relaxed, and have fun. Use a barre chords guitar chart, fix buzzing with rolling your finger, start high on the neck, and practice daily. You’ll get there!

Whether you’re 8 or 80, the joy of nailing that first clean F or B chord is awesome. Grab your guitar, try one shape today—what song will you play once you master them?

Keep strumming—you’ve got this! 🎸


Easy Guitar Chords For Beginners: 7 Simple Chords to Master Fast

Guitar chords for beginners are the perfect place to start when you first pick up a guitar. Imagine you’ve got your guitar in hand, fingers ready, and pick waiting. Then the question hits: “What do I play?” The answer is almost always chords.

Chords are the building blocks of music. They create harmony and give songs their emotional feel. Without them, most music would sound incomplete. Nearly every instrument uses chords in some form (except drums, which focus on rhythm, and bass, which often emphasizes single notes and depth).

If you’re just starting guitar lessons for beginners, learning a handful of basic guitar chords opens the door to hundreds of songs. In this guide you’ll learn the most useful beginner guitar chords, how to read chord diagrams, practical finger tips, and a list of easy songs you can play right away.

Why Guitar Chords Matter for Beginners

At schools like School of Rock, students learn chords early because they apply immediately to real songs. Rhythm guitarists use chords for strumming and fingerpicking, while lead players still need them for song structure. Whether you play electric or acoustic, these shapes form the foundation of rock, pop, folk, and more.

Power Chords – The Simplest Starting Point

Power Chords
Power Chords (Source: Fender)

Power chords are often the first guitar chords for beginners that feel exciting. They use only two or three strings and require minimal finger strength.

These chords sound especially powerful on electric guitars with a bit of distortion, giving that classic rock edge. You can play them on acoustic too, but they really shine with overdrive. Power chords are movable — once you learn the shape, you can slide it up and down the neck to create new ones.

They appear in countless rock and modern songs, making them one of the most practical basic guitar chords to master early.

Open Chords – The Heart of Beginner Guitar Playing

Open chords (also called open-position chords) are perfect for beginners because they include open strings that ring freely. Your fretting hand only presses a few strings while the others stay open.

These are often called CAGED chords because the main shapes are C, A, G, E, and D. Most songs beginners learn rely heavily on these shapes. They require fewer fingers than barre chords and feel more natural at first.

Barre Chords – The Next Step (Save for Later)

Barre Chords
Barre Chords (Source: Prochords.in)

Barre chords are more advanced. You use one finger to press multiple strings across a single fret, then form a shape that can slide anywhere on the neck. They are extremely useful once your hand strength improves, but most guitar lessons for beginners introduce them after open and power chords feel comfortable. We’ll focus on open chords first.

How to Read Chord Diagrams for Beginner Guitar Chords

A chord diagram is a simple map of the guitar neck. Picture the guitar standing upright in front of you:

  • An “X” above a string means don’t play it (mute it).
  • An “O” means play the string open.
  • Numbers show which finger to use: 1 = index, 2 = middle, 3 = ring, 4 = pinky.
  • The horizontal lines represent frets. The top line is the nut (or first fret if numbered).

For example, in an A major chord, your fingers sit on the second fret of the D, G, and B strings.

Note: Chord diagrams and tablature look different. In tab, the bottom line is the low E string and numbers tell you the fret. Don’t mix the two systems.

Essential Open Guitar Chords for Beginners (CAGED Plus a Few More)

Here are the core beginner guitar chords you’ll use constantly:

  • C Major
  • A Major
  • G Major
  • E Major
  • D Major
  • A Minor
  • E Minor

These seven shapes cover a huge number of songs. Practice them slowly until your fingers land in the right spots without looking.

Finger Placement Tips That Actually Help

Good technique makes basic guitar chords sound clean and prevents frustration:

  1. Stay close to the frets – Place your fingertip just behind the fret wire (not on top of it and not too far back).
  2. Use your fingertips – Curve your fingers like a gentle “C” so only the tips press the strings. This stops you from muting neighboring strings.
  3. Check one string at a time – After forming a chord, pick each string individually. If one sounds muted or buzzy, adjust that finger.
  4. Practice the lift-and-hover – Form the chord, then lift your fingers just above the strings and put them back down. This builds muscle memory for smooth changes.

These small habits turn awkward shapes into automatic ones surprisingly fast.

The Ultimate Guide: Which Guitar Is Best for Beginners?

Popular Songs Using Easy Guitar Chords for Beginners

Once you know a few basic guitar chords, you can play real music. Here are proven beginner-friendly songs:

  1. “Sweet Home Alabama” – Lynyrd Skynyrd Mainly C, G, and D. Perfect three-chord practice.
  2. “Bad Moon Rising” – Creedence Clearwater Revival G, D, and A. Simple and fun to strum.
  3. “Love Me Do” – The Beatles G, C, and D in the key of G.
  4. “Good Riddance (Time of Your Life)” – Green Day G, C, Cadd9, and D (or D5 power chord). Great for mixing open and power chords.
  5. “Island in the Sun” – Weezer Em, Am, D, and G. The bridge introduces power chords for extra practice.
  6. “Boulevard of Broken Dreams” – Green Day Em, G, D, and A, with power chords later in the song.

These tracks let you apply guitar lessons for beginners immediately instead of only practicing isolated shapes.

Practice Plan for Faster Progress

Spend 10–15 minutes a day on chord changes. Start with two chords (for example G to C or D to A). Switch back and forth slowly with a steady down-strum. Gradually add more chords and increase speed. Record yourself once a week — you’ll hear real improvement.

If you’re still choosing your first instrument, a solid starter acoustic or electric makes learning basic guitar chords much more enjoyable.

Final Thoughts

Guitar chords for beginners don’t have to feel overwhelming. Start with power chords and the core open shapes (C, A, G, E, D, Am, Em), learn how to read diagrams correctly, apply the finger tips above, and jump into the songs listed. Within a few weeks of consistent practice you’ll be strumming complete tunes.

Keep sessions short and focused, celebrate clean-sounding chords, and remember that every advanced player once struggled with the same shapes you’re learning now. Grab your guitar and start with just one new chord today — the rest will follow.

External resources worth checking:

  • Official chord charts and theory explanations at Wikipedia’s Guitar Chord page
  • Free interactive diagrams and slow-motion videos on reputable guitar education sites